
Recently, I had the chance to setup an ESPS32-S2 Mini to jailbreak a PS4 on 9.00, for a supporter. While there are many tutorials on the web, during the whole journey, I realised that there are subtle differences to be followed while setting up these Arduino boards for jailbreaking PS4. By the way, you should also look into my recent tutorial on setting up your own PS4 exploit website.
Coming back, there are various Arduino boards that can be used to jailbreak PS4. Some common ones include the ESP32 boards which come in three major variants – ESP32, ESP32-S2 and ESP32-S3. In this article, I will show you the process to set up PS4 exploit on ESP32-S2. This will also work to setup variants of ESP32-S2 like ESP32-S2 Mini for PS4 9.00 jailbreak.
All the images used in this tutorial were provided by the forum member, ydvadi_. Thanks to him for that.
Before we jump into the process itself, let us first understand the advantages of using ESP32-S2 for jailbreaking.
Advantages of using ESP32-S2 for PS4 jailbreaking
1. No ExfatHax USB required
If you use ESP32-S2, then you won’t need to prepare another USB with the exfathax.img written to it. This saves time and a lot of hassle, as you don’t have to unplug and plug this USB after every restart while jailbreaking. With ESP32-S2 and ESP32-S3, you can simply leave it plugged on to the PS4 and it will take care of the jailbreaking step. This is why I call it automatic PS4 jailbreaking. This also saves you a lot of headache. Those who use the USB ExfatHax method would know the trouble that ensues when they forget to unplug the USB before booting PS4.
2. Easy upload of new payloads
With Stooged’s Web server that we will be using in this tutorial, adding new payloads is a breeze. We’ll cover that later in the article. That being said, it does have limited design customisation ability when compared to what Index.html generator for PS4Linux exploit can accomplish. This is especially true if you have no idea about HTML coding.
3. No internet required
With Stooged’s Web server script for Arduino boards, the board performs three functions simultaneously – as a web server, a mass storage device holding the exfathax.img and a WiFi hotspot. So, at no point of time would you need to connect to the internet. People who would like to avoid accidentally updating their PS4s or losing PSN access would appreciate this.
4. Upload your own payloads
Like the other options to host your exploits, this one too allows you to upload new payloads as soon as they appear on the scene. All you need is the payloads in .bin format. So, you won’t have to wait for a popular trusted host out there to upload the latest payloads to their jailbreak host site. You can also make your own payloads from source and test them easily.
I have given you the points to decide. If you are ready, let’s begin with the process.
How to jailbreak PS4 (9.00) with ESP32-S2?
As usual, we will begin with the requirements.
Requirements
- Supported ESP32-S2 Board (any of the below):-
- ESP32-S2 Mini (4MB)
- TinyS2 (4MB)
- Adafruit QT Py ESP32-S2 (4MB)
- ESP32-S2 DevKitC-1 (4MB)
- LILYGO TTGO T8 ESP32-S2 WOOR (4MB)
- FeatherS2 (16MB)
- Arduino IDE
- ESP32 Server 9.00U by Stooged (Code > Download ZIP)
- ESPAsyncWebServer (Code > Download ZIP)
- AsyncTCP (Code > Download ZIP)
- Windows 10/11 (preferred)
There are many other ESP32-S2 boards that could work for this. But, many of these would require wiring to work without a standalone ExfatHax USB. So, I recommend you get any of the boards in the list above.
Once you have all these ready and downloaded, we are ready to get started with the process.
Step 1. Connect ESP32-S2 to PC in programming (DFU) mode
- Connect ESP32-S2 to PC using a USB cable.
- Press and hold the button labelled O. While holding O, also start holding the button labelled RST.
- When you hear the connected notification sound on Windows, release both buttons.
Once properly connected, your Device Manager will look like this:-
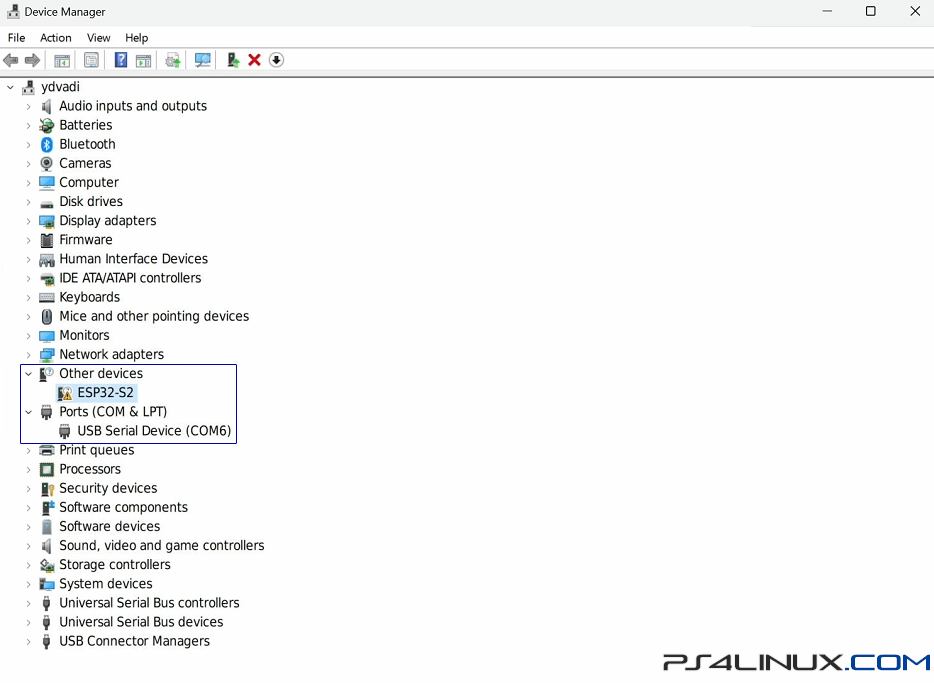
As you can see, there’s a warning sign beside ESP32-S2. That’s not of concern as long as there is a device under Ports (COM & LPT). In this case, we have the ESP32-S2 connected to COM Port 6. Make a note of this.
Step 2. Install and Setup Arduino IDE for programming ESP32-S2
- Install Arduino IDE.
- Open Arduino IDE and go to File > Preferences. In the blank for Additional boards manager URLs, add
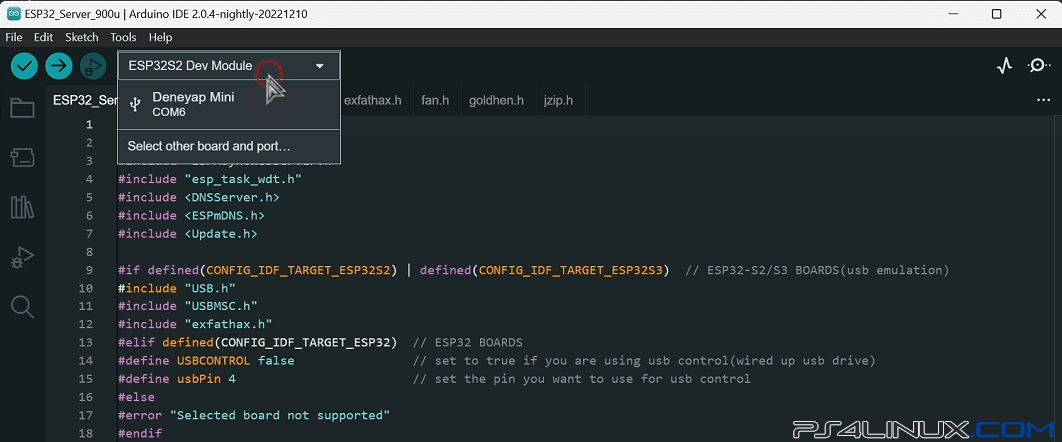
https://raw.githubusercontent.com/espressif/arduino-esp32/gh-pages/package_esp32_index.json. Click OK. - On the top, click on Select Board and choose ESP32S2 Dev Module or Deneyap Mini or anything else depending on your model. You can confirm the device using its COM Port number. For example, here is what mine looks like:-
- Go to Tools > Board: “ESP32S2 Dev Module” > Boards Manager. Search for esp, choose the latest version and click Install, as given in the image below:-

This process will take some time. Wait for it to complete.
Step 3. Setup ESP32 Server 9.00U and flash ESP32-S2 Board
- Extract the downloaded zip file for ESP32 Server 9.00U.
- On Arduino IDE, go to File > Open and browse to the file named ESP32_Server_900u.ino within the folder named ESP32_Server_900u in the extracted archive. It should look like this:-

- Go to Sketch > Include Library > Add .ZIP Library and choose the earlier downloaded ESPAsyncWebServer-master.zip. Repeat the same step to add the other library file, named AsyncTCP-master.zip.
- Back on Arduino IDE, go to Tools and change these settings to reflect the following values:-
- PSRAM : “Enabled”
- Upload Mode: “Internal USB”
- When done, Tools section should like this:-

- Confirm that ESP32S2 Dev Module is still selected. Then, click on the Upload button, which is the button encircled in this image:-
This process may take a few minutes. When completed, this is what you will see in the Output console:-
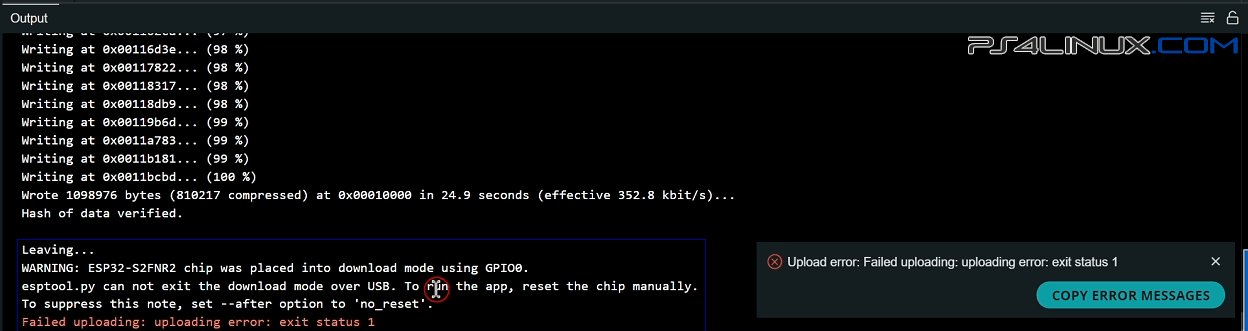
Disregard the error – “Failed uploading: uploading error: exit status 1.” You may now unplug the board from your PC.
Step 4. Upload new PS4 payloads to ESP32-S2
There are a few different ways to upload newer payloads to the Board. One of them is using Arduino IDE, which requires a custom script. But, this can be inconvenient for many, as each time you need to update payloads, you will have to connect the board to your PC in DFU mode. Fortunately, Stooged’s Web server comes with a File Uploader that is easy to access and use. Now, I will show you how you could upload new payloads using the Uploader.
- Turn on the PS4 and connect ESP32-S2 to PS4 without pressing any buttons on it.
- On your PC with WiFi, connect to the access point named, PS4_WEB_AP. The default password is
password. - Once connected, open a web browser and point it to http://10.1.1.1/admin.html.
- Click on FIle Uploader. Browse to the .bin payloads you wish to have on the PS4. Click on Upload.
- Go to File Manager to make sure that the payloads have been uploaded.
- Disconnect WiFi on PC.
Step 5. Access ESP32 Server 9.00U Exploit Page on PS4
- On PS4, go to Settings > Network. Enable the option that says, Connect to the Internet.
- Go to Set Up Internet Connection > Use Wi-Fi > Custom.
- Connect to the access point, PS4_WEB_AP with the default password, i.e.,
password. - Under DHCP Host Name, choose Do Not Specify.
- Under DNS Settings, choose Manual and set
10.1.1.1for both the Primary and Secondary DNS. When done, select Next. - Under Proxy Server, select Do Not Use.
- When it asks to test the internet connection, press on the Circle button to exit.
- To access the exploit page, go to Settings > User’s Guide and Helpful Info > User’s Guide. Alternatively, you can go to the PS4 web browser and point it to http://10.1.1.1.
- That’s it!
Conclusion
I hope you enjoyed this tutorial. If you face any issues following this tutorial, just leave a comment below and I’ll get back to you.

Awesome Stuff Bro 😀
Arduino IDE 100% succes but no AP on esps32 s2 mini v1.0.0
Same here .. Same Board .. no AP
Watch this YouTube video https://www.youtube.com/watch?v=FteGc33nmAg
This has a much faster and easier method. I used a ESP32-S2-Mini v1.0.0 to do the automatic auto exploit
Will ESP32-S2-DevKitC-1U-N8R2 Development Board also work?
https://www.amazon.ae/gp/product/B0B97J7PGW/ref=ox_sc_saved_image_2?smid=A2QUTRSO1ZHRN9&psc=1
Not sure. Those known to work have been listed in the article.
Hey, does any body how can i use my jailbreak on ps4 9.0 acutally my all my usb port stop working its kinda board error is there any way i can connect to jailbreak?
i have a sp32 s2 which i bought with my flipper zero. will this work for this jailbreak too?
I have a ESP32-S3-DevKitC-1-N32R8V. I setup everything but get a weird error about No Module Named serial. I ignored it but there was nothing programmed or burnt? I Chose ESP32S3 Dev Mod. I will try again with the dgey defaults? Thanks for yur tut!
Any luck?
I know this is old but it is now giving a compilation error. The libraries have been updated by Ardino – could that be the cause?
Nice tutorial , thanks. But I get a compile error, this:
761 | WiFi.setAutoConnect(true);
| ^~~~~~~~~~~~~~
| setAutoReconnect
exit status 1
Compilation error: ‘class WiFiClass’ has no member named ‘setAutoConnect’; did you mean ‘setAutoReconnect’?
what to do ? I followed the steps earlier..
Regards, Mads
me too I have esp32-S3-devkitc1 and I keep getting wifi compile errors too…
/DATA/PS4/PS4-JB/ESP32-Server-900u-main/ESP32_Server_900u/ESP32_Server_900u.ino: In function ‘void setup()’:
ESP32_Server_900u:761:10: error: ‘class WiFiClass’ has no member named ‘setAutoConnect’; did you mean ‘setAutoReconnect’?
761 | WiFi.setAutoConnect(false);
| ^~~~~~~~~~~~~~
| setAutoReconnect
exit status 1
‘class WiFiClass’ has no member named ‘setAutoConnect’; did you mean ‘setAutoReconnect’?
I added both libraries. Perhaps the libraries were updated and broke?
Could you precompile and link your binary file?
For everyone getting the setAutoReconnect error, and then if you commented that line out, and it said there’s not enough space on the board for the sketch, make sure to:
GET THE SAME ESP32 BOARD MANAGER VERSION THE ARTICLE STATES IN THE PICTURE
DONT get the latest
Get 2.0.4
That fixed it for me
As several commenters have said, the source code line with “WiFi.setAutoConnect(false);” needs to be removed, as the current versions of the ESP32 WiFi library don’t have this function any more.
And you need to use the esp32 versions 2.0.X . The current 3.x releases will compile a binary file that is too large for a ESP32-S2.