

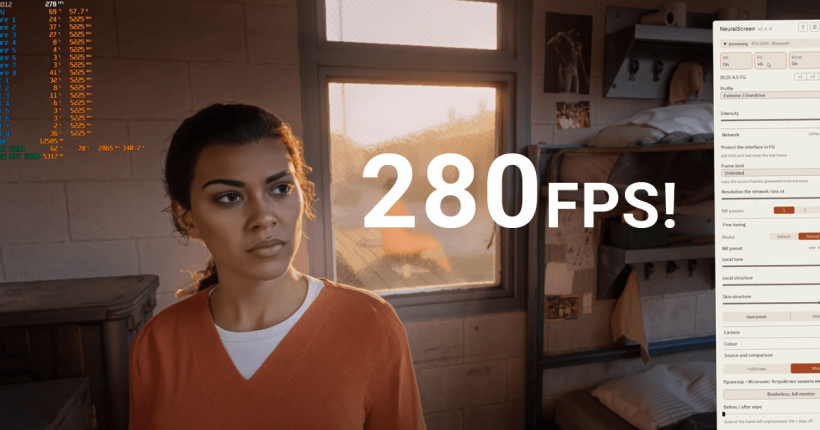
Only a few days ago did I post about VeyraNR, that claims to hit 120FPS in 4K with the PS5 version of GTA VI. Now, tinkerers at GameGPU have more than doubled it. In their tests, NeuralScreen hit 280FPS in 4K in GTA VI (PS5 version). They have shared videos and also confirmed the PS5 version of GTA VI is capped at 30FPS.
GTA VI at 4K 280FPS: Videos
Here are videos the team shared of their gaemplay:-
How did they get 280FPS in 4K with PS5 version of GTA VI?
If you already read my article on VeyraNR, or are familiar with neural rendering and DLSS5, you know how this works. But, for those of you who aren’t aware, here’s a quick breakdown. You can read all about it, on their website here.
The GameGPU team connected their PS5 Pro to their beefy PC using an AVerMedia capture card and used NeuralScreen v2.6.4 to achieve this. They enabled realtime DLSS5 neural rendering and DLSS 4.5 6X frame generation. Now, you probably want to know the PC’s specs right? Here you go:-
- CPU – Ryzen 7 9800X3D (considered one of the best CPUs for gaming)
- GPU – NVIDIA GeForce RTX 5090 (needs no introduction, being sold for $9000+ right now)
- RAM – 128GB
On their website, GameGPU reports that their setup was able to handle the enhanced rendering with ease, while the temperatures were well under control. But, remember that their setup hit 280FPS in a stationary scene, specifically the intro scene featuring the character, Lucia Caminos. I don’t want to reveal anything further about the scene, because I know some of you hate spoilers. Anyways, the FPS ranged from 262-280FPS in the scene itself. Thus, some scenes and sections of the game requiring rendering of multiple scenes will obviously struggle to hit 280FPS, but, it should be around that range for most sections, which is impressive! They also tested some high-speed driving sessions and claim they were able to get 249 to 282 FPS.
Now, to the question that many of you rich readers and dreamers (like me) have in their mind.
How to achieve 280FPS in GTA VI using NeuralScreen?
Well, before beginning, I’d like to make myself clear. I neither have the PS5 Pro, nor GTA VI. A beefy PC is still a dream. But, since many of you already have all three ready to go, I am just going to share a basic tutorial of how this could be achieved (virtually). Obviously, many of us can’t afford the stuff that running GTA VI at 280FPS in 4K requires, consider the following tutorial a fun project. I am also going to leave links (affiliate links) to hardware this will require.
Requirements
1. PS5 Pro and GTA VI
- PS5 Pro – Buy Now (US/IN): You could also try this on a PS5, which according to reports is also capable of 30FPS, but, a Pro is preferred.
- GTA VI – Buy Now (US/IN): Keep a video of the unboxing and redeeming handy. Many are complaining they got redeemed codes.
2. A beefy PC
To be safe, I do recommend atleast these specifications, based on GameGPU’s article. As I have already said, I haven’t tested it yet (due to poverty).
- Recommended CPUs: Also get good coolers, preferably liquid cooling solutions.
- Recommended GPU – NVIDIA GeForce RTX 5090 – Buy Now (US/IN)
- RAM – 64GB DDR5 or more – Buy Now (US/IN): Better to get 6000MHz or 6000+MHz.
These are the major components that decide whether you will hit that whopping 280 or not.
3. Capture Card
Aim for atleast 4K 144Hz when getting a capture card for this. Here are some recommendations:-
- AVerMedia Live Gamer Ultra 2.1 (GC553G2) – Buy Now (US/IN): Used by GameGPU team.
- Elgato 4K X – Buy Now (US/IN)
You do not necessarily need a card capable of 4K 144Hz, as the game from PS5 Pro will output only a maximum of 30FPS. Correct me, if I am wrong. So, here are a few more suggestions for good capture cards you can consider (but, not all of them might be capable of what we are trying to achieve here).
USB Capture Cards
PCIe (Internal) Capture Cards
- Elgato 4K Pro – Buy Now (US/IN)
- Magewell Pro Capture Cards (Extremely expensive, developer confirms it has low latency) – Buy Now (US/IN)
Pro Tip: Black Friday is almost here. Join our Telegram channel or Discord server to receive latest deals!
4. 4K Monitor
Now, here is where the dilemma is. Do you actually need a 200+ FPS monitor to achieve this? No. But, let me explain. Even on a 60Hz monitor connected to a beefy machine with specs as listed above, GTA VI on NeuralScreen can hit 280FPS. But, would the experience be good? Not guaranteed. Monitors supporting AMD FreeSync might be able to deal with the tearing on a low FPS monitor to a limit, but, for this, I recommend that you get atleast a 4K monitor capable of 120FPS.
Here are some recommendations for the best experience (affiliate links):-
- ASUS ROG Swift PG27UCDM (27″, 4K240, QD-OLED) – Buy Now (US/IN)
- Dell S3225QC (32″, 4K120, QD-OLED) – Buy Now (US/IN)
- Acer Nitro XV275K (27″, 4K160, MiniLED) – Buy Now (US/IN)
If you can afford it, do go for higher models:-
- 4K 165Hz monitors – Buy Now (US/IN)
- 4K 180Hz monitors – Buy Now (US/IN)
- 4K 240Hz monitors – Buy Now (US/IN)
Pro Tip: Black Friday is almost here. Join our Telegram channel or Discord server to receive latest deals!
5. Windows 10/11 with NeuralScreen, OBS Studio and other additional software
Make sure your GPU drivers are updated before proceeding. Then, download the latest release of NeuralScreen. While v2.6.5 is the latest version (as of 19th November, 2026), GameGPU team tested on v2.6.4.
Download the latest OBS Studio as well.
I also recommend you install MSI Afterburner to get an OSD showing the temperatures, FPS and other details you could monitor in realtime.
Tutorial: 4K 280FPS in GTA VI with NeuralScreen on Windows
Once you have all the requirements setup, let’s move into the actual tutorial. By the way, if you are lazy and would like a readymade solution, try VeyraNR for GTA VI as well, with the beefy setup. By the way, NeuralScreen compulsorily requires an NVIDIA GPU. Needless to say, it failed to even start on your humble servant’s AM4 APU PC.
Step 1. Setup PS5 Pro, Capture Card and OBS Studio
- On PS5 Pro, go to Settings > System > HDMI and ensure Enable HDCP is turned off.
- Connect PS5 to your capture card via HDMI cable and connect the capture card to your PC via USB (or PCIe, if you go that route).
- Open OBS Studio on PC, under Sources, click on + and choose Video Capture Device. In the window that opens, click on OK.
- In the new window, under Device, select your capture card. Change any settings here, if you wish. Once done, click OK.
- Make sure your PS5 Pro Video is now being output to OBS Studio properly.
- Right click on the preview, select Open Preview Projector and select your monitor. If you have a multi-monitor setup, choose any monitor.
- Right click on the fresh preview that opens and click on Windowed. You are free to use any other mode and even resize the resultant window, since NeuralScreen supports them.
Step 2. Setup NeuralScreen and start playing GTA VI at 280FPS
- Extract the downloaded NeuralScreen .zip file.
- Run NeuralScreen.exe or NeuralScreen.vbs. Windows might throw a warning. If it does, click on More info and then Run anyway.
- Once it opens, check if the GPU is properly detected by checking if there’s a green dot next to your GPU’s name. If the menu doesn’t show, make sure Num Lock is turned on and press on 2.
- Click on Source (or Source and Comparison), choose one-window mode or Window mode and select the projected OBS window.
- Now, set the following:-
- NR (Neural Rendering): On
- FG (Frame Generation): x6
- Boost: On
- Camera: Off
- Profile: Extreme / Overdrive
- You may also play with the other settings.
Conclusion
VeyraNR too uses NeuralScreen or atleast a fork of it underneath it. So, if you feel like it, do try VeyraNR, which doesn’t require a separate OBS installation and also supports Remote Play (probably no 280FPS though). Anyways, for such crazy updates, stay tuned!
Leave a Reply